File Setup
Understanding Options for Saving to PDF
Laying Out Documents for Print
Creating and Exporting Bleeds Using Adobe InDesign
Using Adobe InDesign's Print Booklet Plug-In
Creating a Cutting Path for the Roland
Batch Processing Using Adobe Bridge
This document is intended to help you create PDFs for your desired output intent (e.g. image quality, color, printer marks). This document only covers PDF creation in its most basic form.
Alternative Resources
For a more in-depth understanding of this topic, we recommend the following School of Print Media class: Digital Asset Management. If you have questions, please consult your instructor or a DPC Customer Service Representative (CSR).
Important Facts
When indexing a large number of images, it may be beneficial to create a file naming convention for better organization. This first tutorial will walk you through the steps required to rename multiple files in one step using Adobe Bridge CS3.
Actions created in Photoshop can be performed on multiple images through Adobe Bridge. This includes resizing images to a standard size, performing color conversion, running filters on several images at once, and you can create other actions using Photoshop. The only pre-requisite is that you have to first create these actions in Photoshop before Bridge can perform them. Once this has been done, you can follow the second set of instructions to batch apply the action using Adobe Bridge CS3.
How to Bacth Rename Files
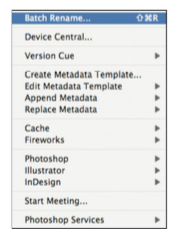
Figure 1: Location of Batch Rename tool in Bridge

Figure 1: Location of Batch Rename tool in Bridge
How to Batch Apply Adobe Photoshop Actions
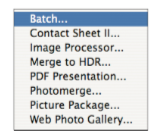
Figure 3: Location of batch apply in Bridge
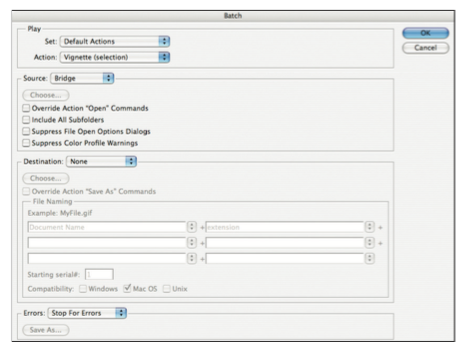
Figure 1: Selecting a PDF preset (Indesign)