File Setup
Understanding Options for Saving to PDF
Laying Out Documents for Print
Creating and Exporting Bleeds Using Adobe InDesign
Using Adobe InDesign's Print Booklet Plug-In
Creating a Cutting Path for the Roland
Understanding Options for Saving to PDF
This document is intended to help you create PDFs for your desired output intent (e.g. image quality, color, printer marks). This document only covers PDF creation in its most basic form.
Alternative Resources
For a more in-depth understanding of this topic, we recommend the following School of Print Media classes: Graphic Media Workflow II and Color Management. If you have questions, please consult your instructor or a DPC Customer Service Representative (CSR).
Important Facts
In the graphic arts industry, the use of a PDF workflow has grown rapidly in the past decade. However, problems may occur when printing PDFs that have been improperly created. Many of these issues can be avoided if PDF creation options are selected appropriately for the intended method of printing.
Creating a "Clean" File
Raster image processors (RIPs) must “flatten” and “rasterize” all graphics on a page before printing. The process of reducing layers, overlapping object transparency, text, and images into a single image can be extremely complex.
To avoid potential problems at the RIP, the following operations are recommended before creating your PDF:
Locating the Tool
Once you have created a clean file, the option to save your file as a PDF is located in a different place in the various programs.
InDesign: File > Export > Adobe PDF Illustrator: File > Save as > Adobe PDF Photoshop: File > Save as > Adobe PDF
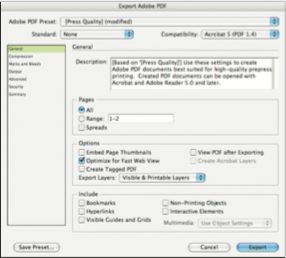
Figure 1: Selecting a PDF preset (Indesign)
Choosing PDF Options
Adobe PDF Presets: Choosing a PDF preset will apply a template of basic settings (Figure 1). For sending a file to the DPC, you want to select Press Quality or High Quality Print, as it will best preserve your original image. Once you change any setting, the preset name will appear with the title “modified” next to it.
If you find yourself using the same settings repeatedly, you should save these settings to a custom preset. To do this, click “Save Preset…” at the bottom left of the dialogue box. (Figure 2)
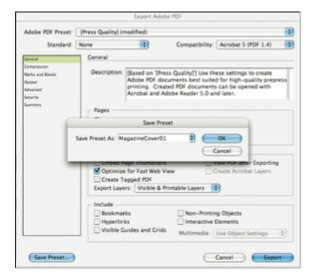
Figure 2: Saving a custom PDF preset (InDesign)
General (Figure 1): For print, in Photoshop and Illustrator, it is recommended that you disable “Preserve Editing Capabilities” if it exists as an option. Be sure to save the original separately in order to make any edits if necessary.
Standards (Figure 1): Under the Standards setting, there are options for various PDF/X standards. These ISO standards are for PDFs that are intended for print. For more information regarding which PDF/X to use for your document, refer to the ISO documentation on each standard.
Compatibility (Figure 1): The setting for Compatibility refers to the version of Adobe Acrobat that is required to open the PDF file you are creating. When you choose a preset, this will automatically be set. When printing in the DPC, we recommend the PDF 1.3 setting, unless you adhere to a standard that required a newer version.
Compression (Figure 3): This menu controls how far your image is downsampled. Your choice will depend on the resolution desired. A generally accepted resolution when printing images is 300 ppi. Depending on your image requirements, you may also want to change the setting for compression and image quality.
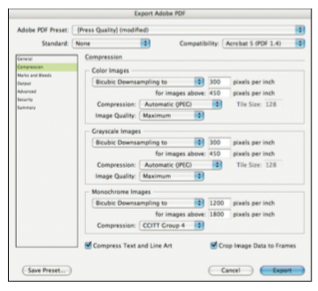
Figure 2: Saving a custom PDF preset (InDesign)