File Setup
Understanding Options for Saving to PDF
Laying Out Documents for Print
Creating and Exporting Bleeds Using Adobe InDesign
Using Adobe InDesign's Print Booklet Plug-In
Creating a Cutting Path for the Roland
Using Adobe InDesign Print Booklet Plug-in
This document is intended to help you prepare your files submitting a saddle-stitch booklet to the DPC. This only covers using Adobe InDesign’s Print Booklet plug-in in its most basic functionality. Your file may require more advanced settings for proper output.
Alternative Resources
For a more in-depth understanding of this topic, we recommend the following School of Print Media classes: Digital Foundations and Print Production Workflow. If you have questions, please consult your instructor or a DPC Customer Service Representative (CSR).
Terms to Know
Saddle-Stitch:
In the graphic arts industry, the use of a PDF workflow has grown rapidly in the past decade. However, problems may occur when printing PDFs that have been improperly created. Many of these issues can be avoided if PDF creation options are selected appropriately for the intended method of printing.
Duplex:
Printing on both sides of a sheet of paper.
Bleed:
This refers to printing that goes beyond the edge of the sheet after trimming. The bleed area is the extended image of the printed document that gives the printer that small margin of error for shift between sheets and finishing inconsistencies. By US standards, bleeds are generally 1/8 of an inch (0.125”) from where the cut is to be made.
Creep:
Depending on the binding method, the inside pages of a set of folded pages may extend slightly beyond the outside pages. Using the “creep” setting can compensate for this by making the inner margin of the inside pages smaller. This is commonly seen in saddle-stitch booklets with a large number of pages (usually over 16 pages).
How to Choose the Correct Document Settings
Adding Bleed Margins
Depending on the design of your book, you may want certain elements (e.g. images, graphics) to print to the trim of the document. This requires a special setting known as bleed margins. The setting can be found in the initial document set-up dialogue box or modified once the document has been created (Edit → Document Setup). Detailed instructions for creating bleeds can be found in the DPC User Resource entitled “Creating and Exporting Bleeds Using Adobe InDesign”.
Adding Document Margins
The document margins of any document are typically used to provide numerical guides to the designer’s layout. However, document margins or rules can also serve as a warning for the designer. For saddle-stitch booklets, an inside document margin is not necessary because there is no physical interruption between spreads. The pages sit directly next to each other.
However, wire-bound books require an inside document margin of at least 0.25". The hole punches for the wire end at about 0.25" into the gutter (space between the binding edge and the copy) of the spreads. For tape bound or perfect-bound books (for digital print production), there are no hole-punches that will interrupt the design; however, because of this fact these types of books will not lay flat, meaning that a portion of the inner margin will not be readable. Designers should avoid putting type or other important elements within this gutter.
How to Use Print Booklet
InDesign Print Booklet is a plug-in that is included with the purchase of Adobe InDesign CS3. In the previous version, this plug-in was called InBooklet SE. For a DPC customer, this plug-in serves as a helpful tool for creating impositions of booklets that will be saddle-stitched after printing. Follow these simple instructions to use this plug-in.
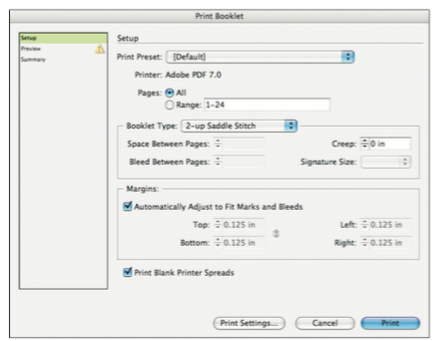
Figure 1: Setup of Print Booklet options
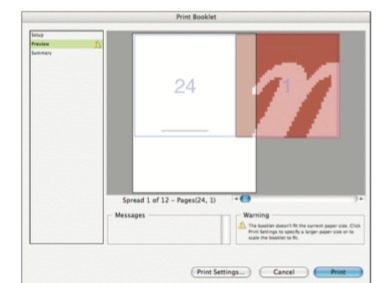
Figure 2: Preview before print settings have been made
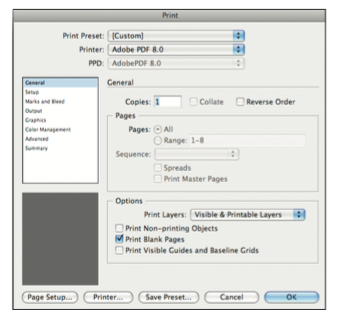
Figure 3: General options under Print Settings
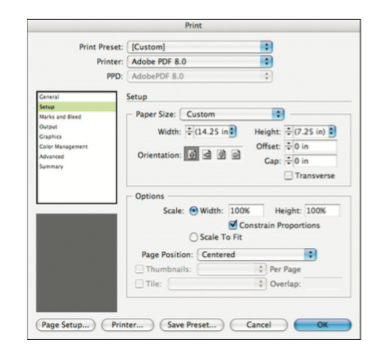
Figure 4: Setup options under Print Settings
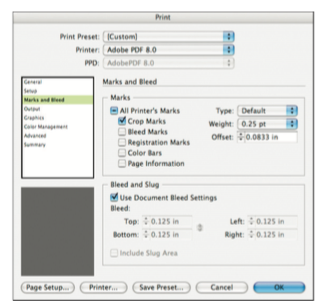
Figure 5: Marks and Bleed options under Print Settings
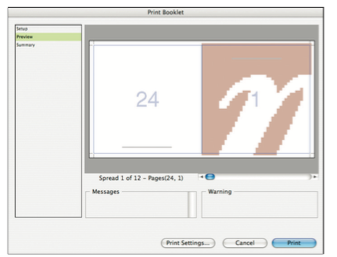
Figure 6: Preview after print settings were modified